Removing Hazardous DIY Waste After Renovations in Woolwich
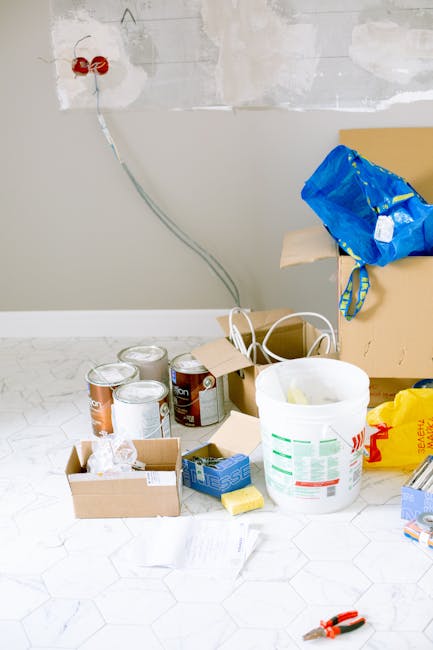
Renovating a home can feel brilliant right up until the dust settles and you are left staring at a pile of awkward, dirty, and potentially risky waste. Broken plasterboard, old paint tins, solvent-soaked rags, treated timber, adhesives, sealants, wiring offcuts, and the odd mystery container from the back of the shed can all end up in the same corner. That is where Removing Hazardous DIY Waste After Renovations in Woolwich becomes more than a tidy-up job. It becomes a safety job, a sorting job, and, frankly, a sanity-saving job too.
If you have just finished a kitchen refit, knocked through a wall, stripped a bathroom, or tackled a weekend DIY project that somehow lasted three months, this guide walks you through what hazardous renovation waste is, why it matters, and how to deal with it properly in Woolwich. You will also find practical steps, common mistakes, and a simple checklist you can actually use. Let's face it, nobody wants a half-finished renovation made worse by a bag of unsafe rubbish sitting in the hallway.
Table of Contents
- Why removing hazardous DIY waste after renovations in Woolwich matters
- How the process works
- Key benefits and practical advantages
- Who this is for and when it makes sense
- Step-by-step guidance
- Expert tips for better results
- Common mistakes to avoid
- Tools, resources and recommendations
- Law, compliance, standards, or best practice
- Options, methods, or comparison table
- Case study or real-world example
- Practical checklist
- Conclusion
- Frequently asked questions
Why Removing Hazardous DIY Waste After Renovations in Woolwich Matters
Hazardous DIY waste is not just "messy waste". It can include materials that irritate skin, give off harmful fumes, cause cuts, contain hidden contaminants, or create fire risk if stored badly. After a renovation, people often have a mixed pile of safe and unsafe items, and that is exactly where things get tricky. A paint tin with dried residue might seem harmless. A partially used adhesive cartridge, not so much. A bag of plaster dust is one thing; a container with unknown liquid in the bottom is another.
In Woolwich, as in the rest of London, homeowners and landlords often try to deal with renovation leftovers quickly so the property can be used again. That makes sense. But rushing hazardous waste into normal household bins, or leaving it in a garden corner "for later", can create problems very fast. Children, pets, and tradespeople all come into contact with the same spaces. One knocked-over tin or torn bag can be enough to turn a tidy project into a risky one.
There is also the practical side. Mixed renovation waste is harder to move, harder to sort, and usually more expensive to correct later. If you separate hazardous items early, the whole clearance becomes simpler. If you do not, you may end up with a bigger, heavier, and more awkward pile than you expected. We see this often: a loft or garage full of good intentions, and one grim little corner of unsafe materials that nobody wants to touch. Understandably.
Expert summary: the safest approach is to identify hazardous DIY waste early, keep it separate, label unknown items where possible, and arrange a proper clearance route before the waste spreads across the property.
How Removing Hazardous DIY Waste After Renovations in Woolwich Works
The process is usually simpler than people imagine, but it does need a bit of structure. Hazardous DIY waste removal starts with sorting. You are looking for anything that may need special handling because of its contents, condition, or contamination risk. Typical examples can include leftover paint, varnish, thinners, solvents, caulk tubes, adhesives, chemicals, sealants, aerosol cans, treated wood, asbestos-related materials if encountered in older properties, and any sharp or contaminated renovation offcuts.
After sorting comes safe storage. That means keeping containers sealed, placing sharp items in puncture-resistant packaging, and separating anything that could leak, drip, or react with other materials. If a container is rusty, bulging, or unlabeled, treat it carefully. Not with panic, just caution. A little care here goes a long way.
Next is collection and removal. For larger renovation jobs, many people choose a dedicated clearance service rather than trying to make repeated trips themselves. That can be a good decision if you have bulky bags, mixed rubble, sharp fragments, or awkward access down narrow stairs. Services such as builders waste clearance or broader waste removal can be a sensible fit when DIY waste is mixed with general renovation debris. If the project was part of a larger property refresh, it may also help to look at home clearance or house clearance depending on how much material is involved.
The final stage is responsible disposal and sorting for recycling or specialist treatment. Not every item can go in the same stream, and that is the whole point. Keeping materials separate improves safety, reduces contamination, and supports better recycling outcomes. It also makes the site feel calm again. Which, after a renovation, is a lovely thing.
Key Benefits and Practical Advantages
There is a strong practical case for handling hazardous renovation waste properly, and not just because it feels like the "right thing" to do.
- Safer living space: you reduce exposure to fumes, dust, leaks, and sharp objects.
- Cleaner project wrap-up: the home looks finished, not halfway between a building site and a storage cupboard.
- Less stress: no more wondering whether a tin belongs in the bin or in a specialist stream.
- Better organisation: separating waste makes the rest of the clearance faster and easier.
- Improved recycling potential: clean, sorted materials are easier to process responsibly.
- Lower risk of mistakes: you are less likely to mix dangerous items with everyday rubbish.
There is a hidden benefit too: confidence. Once the hazardous stuff is gone, the rest of the renovation feels properly completed. You can move furniture back, reopen rooms, and breathe without that nagging sense that something unsafe is lurking behind the bin bags.
If your renovation also involved furniture changes, wardrobes, or built-ins, you may find it useful to combine clearance with furniture disposal or even furniture clearance so the whole space is dealt with in one go.
Who This Is For and When It Makes Sense
This kind of waste removal is relevant to a lot of people, not just serious DIYers. If you have renovated a flat, updated a family house, converted a loft, cleared out a garage, or simply replaced tired fittings and paintwork, you may have hazardous leftovers even if the job looked small at first.
It especially makes sense for:
- Homeowners finishing a bathroom, kitchen, or bedroom refresh
- Landlords preparing a rental for new tenants
- People clearing a garage, loft, or basement after DIY storage has built up over years
- Anyone dealing with mixed renovation debris and unsure what can be reused, recycled, or removed safely
- Busy households that need the waste gone quickly before the next stage of decorating starts
There is also a real difference between a neat, predictable job and a messy one. If your renovation created just a few sealed paint tins, you may only need a small and careful disposal plan. If you have plaster dust, chemicals, broken tiles, sharp timber, and a couple of suspicious old containers, you are in "sort it properly first" territory. No drama. Just common sense.
For properties where the renovation has taken over multiple rooms, a broader service like flat clearance or loft clearance may be more appropriate than treating it as a single waste pile.
Step-by-Step Guidance
Here is a straightforward way to tackle hazardous DIY waste after renovations without making a mess of it.
1. Walk the site and identify risk items
Start with a slow look around the renovation area. Check corners, under tarps, behind doors, and in storage boxes. Look for liquid containers, aerosols, sharp offcuts, old sealants, stained cloths, and anything that smells strong or looks unstable. If something is unlabeled, be extra careful. Better safe than sorry, as your nan would probably say.
2. Separate hazardous waste from general rubble
Do not mix dangerous items with clean plaster, wood, cardboard, or standard renovation debris. Once materials are mixed, the whole pile becomes harder to handle. Keep the hazardous items in their own container or bag, and keep sharp things wrapped securely.
3. Seal, label, and stabilise containers
Make sure lids are closed properly and packets are not leaking. If you have a container with an unknown residue, label it clearly rather than forgetting what it is. Even a simple note helps later. If a container is damaged, place it inside a second secure container if appropriate.
4. Clear the surrounding area
Move loose tools, paintbrushes, roller trays, and leftover fittings out of the way so the waste can be lifted safely. This is the point where many people discover just how much stuff was hiding in plain sight. It happens.
5. Arrange the right removal method
Choose the disposal route based on volume, access, and risk. Small amounts may be handled through careful household storage and the correct collection route. Larger or mixed renovation loads are often easier through a specialist clearance team. If the project also involved an outbuilding or outdoor refresh, garage clearance or garden clearance can help remove the associated clutter too.
6. Confirm the area is genuinely safe
After removal, check for dust, residue, splinters, and hidden fragments. A quick sweep is not enough if you have handled chemical or sharp waste. Finish with a careful clean so the space is ready for normal use again.
Expert Tips for Better Results
A few small habits make the whole process smoother, and they are usually the difference between "managed" and "ugh, what a nightmare".
- Sort as you go: do not wait until the end of the renovation. A little sorting each day saves a big headache later.
- Keep a dedicated waste corner: one marked area for hazardous items stops them wandering across the house.
- Use gloves and sturdy footwear: simple, but effective. Wet paint and broken edges are not your friends.
- Do not rely on smell alone: some hazardous materials are obvious, others are not.
- Photograph unknown items: useful for your own records before removal, especially if several similar containers are involved.
- Book clearance before the final decorating stage: it is much easier to move waste out before new flooring or freshly painted walls go in.
One detail people often miss: a sealed bag can still be unsafe if it contains sharp fragments or contaminated debris. So don't assume that "bagged" means "safe". It often doesn't. A good rule is to ask, "would I want this tipped over in the boot of my car?" If the answer is no, handle it more carefully or hand it to a proper clearance team.
If you are trying to compare approaches, it can also be useful to review service information such as pricing and quotes before you decide how much of the job to do yourself.
Common Mistakes to Avoid
Most problems with renovation waste happen because people are busy, tired, or trying to save time. Fair enough. But a few errors come up again and again.
- Throwing everything into one pile: this makes hazardous materials harder to identify and sort later.
- Breaking open containers to "see what's inside": bad idea. If it is unknown, keep it closed.
- Storing waste near heat or sunlight: some materials are best kept stable and out of the way.
- Ignoring old products in cupboards or sheds: renovations often uncover forgotten tins, aerosols, and chemical leftovers.
- Using thin bags for sharp waste: they split, and then you have a second problem on your hands.
- Leaving disposal until the last minute: this is how hallways become obstacle courses.
Another common slip is assuming a small amount is always harmless. A little leftover solvent, or a dusty old tin, may not look like much, but the risk is in the contents and condition, not just the volume. Tiny can still be troublesome.
Tools, Resources and Recommendations
You do not need a warehouse of specialist kit, but the right basics help a lot.
| Tool or Item | Why It Helps | Best Use |
|---|---|---|
| Heavy-duty gloves | Protects hands from cuts, grime, and residue | Sorting, lifting, bagging |
| Sturdy waste sacks or tubs | Helps contain loose debris safely | Sharp fragments, mixed offcuts |
| Labels and marker pen | Makes unknown items easier to identify later | Storage and segregation |
| Dust mask or respirator | Useful when handling dusty renovation waste | Cleaning and sorting |
| Seal-friendly containers | Reduces leakage and spill risk | Liquids, residues, small containers |
| Brush and pan or vacuum suitable for fine dust | Helps clear the area after removal | Final tidy-up |
If the renovation has expanded into a full property declutter, you may also want to consider house clearance or, where the work is tied to a property sale or emptying process, broader home clearance. These are not just "bigger versions" of the same thing; they are useful when renovation waste is only one part of a larger clear-out.
And if sustainability matters to you, it probably should, a review of recycling and sustainability is worth a look. Responsible disposal is not only about safety; it is about reducing what ends up as avoidable landfill too.
Law, Compliance, Standards, or Best Practice
For hazardous DIY waste, the main thing is to follow accepted UK waste-handling best practice and use caution where materials may be regulated, contaminated, or difficult to identify. You do not need to be an expert on every classification to behave safely, but you should avoid guessing. When in doubt, treat the material as potentially hazardous until it is properly assessed.
There are a few simple principles worth keeping in mind. First, do not dispose of risky renovation waste with ordinary household rubbish unless you are certain it is safe to do so. Second, keep waste secure during storage and transport so it does not leak, split, or create a hazard in transit. Third, if the waste includes material that may require specialist handling, use a service that understands the safety and disposal side of the job, not just the lifting side.
For business premises or landlord-managed work, the same caution applies, only with more moving parts. A rental flat renovation, for example, may involve tenant belongings, building debris, and disposal responsibilities that need to be managed carefully. In those situations, services such as business waste removal can be relevant where the waste is connected to commercial or managed property activity.
It is also sensible to check that any provider you use has clear safety practices, appropriate insurance, and transparent terms. That is not overthinking it. That is just being sensible with sharp objects and chemicals in a family home.
Options, Methods, or Comparison Table
There is no single "best" method for every renovation. The right choice depends on how much waste you have, how hazardous it is, and how quickly it needs to go.
| Method | Best For | Pros | Trade-Offs |
|---|---|---|---|
| Self-sorting and storage | Small, manageable quantities | Low immediate cost, flexible timing | Takes time, needs care, still requires correct disposal route |
| Mixed waste clearance | Renovation jobs with both safe and hazardous items | Convenient, quicker site tidy-up | Needs proper segregation before pickup |
| Room-by-room clearance | Whole-house or multi-room works | Organised, easy to stage over several days | Can feel slower if you need everything gone at once |
| Specialist handling for sensitive waste | Items that may need extra care | Safer for difficult materials, less guesswork | Requires careful planning and appropriate collection |
For people who want the waste gone quickly after a renovation, a service approach often saves the most time and reduces stress. If the job has become more than expected, a professional clearance route usually beats several exhausting trips in a hatchback. No contest, really.
Case Study or Real-World Example
Here is a realistic example from the kind of situation many Woolwich households recognise. A couple finishes a small bathroom renovation in a Victorian terrace. The visible waste is straightforward enough: broken tiles, old packaging, a cracked sink, and some timber offcuts. Then they open a cupboard and find half-used adhesive tubs, an old sealant gun, two rusting paint tins, and a box of mixed rags that smell strongly of solvent.
At first, they assume it is all "just renovation rubbish". But once they sort it out, they realise the pile has two very different groups: general builders' waste and items that need careful handling. They keep the hazardous materials sealed and separate, clear the area around them, and arrange removal alongside the rest of the debris rather than leaving it to sit in the bathroom for weeks. The result is simple: the room can be cleaned properly, the family can use it again, and nobody has to keep stepping around a suspicious pile every morning.
That is the real value here. It is not dramatic. It is practical. The kind of practical that makes your home feel like yours again by tea time.
Practical Checklist
Use this checklist before, during, or after your renovation waste clearance.
- Identify all containers, tins, aerosols, and chemical residues
- Separate hazardous items from general DIY debris
- Keep sharp offcuts wrapped or boxed securely
- Check for leaks, rust, damage, or bulging containers
- Label unknown materials clearly
- Store waste away from heat, children, and pets
- Do not mix wet, dry, sharp, and chemical waste together
- Choose the right clearance method for the amount and type of waste
- Clean the area after removal so no fragments are left behind
- Review the rest of the property for hidden waste in sheds, lofts, or garages
If your project spread beyond one room, it may be worth combining the waste job with a full property tidy-up using garage clearance or loft clearance so the hidden backlog disappears too.
Conclusion
Removing hazardous DIY waste after renovations in Woolwich is one of those jobs that looks small until it suddenly isn't. The good news is that once you know what to look for and how to separate it, the process becomes much more manageable. Sort early, store safely, avoid mixing waste types, and use the right clearance route for the scale of the job. That keeps your home safer, your renovation tidier, and your next steps far less stressful.
Whether you have a handful of sealed paint tins or a mixed pile of renovation leftovers that has taken over the hallway, the main aim is the same: clear it properly and keep the space safe for everyone who uses it. Simple, really. Not always easy, but simple.
Get a free quote today and see how much you can save.
When the dust has finally settled, there is something quietly satisfying about looking at a clear room and knowing the hard part is done. That peace of mind is worth a lot.
Frequently Asked Questions
What counts as hazardous DIY waste after a renovation?
Hazardous DIY waste can include leftover paints, solvents, adhesives, sealants, aerosol cans, chemically treated materials, contaminated rags, and sharp or broken items that could injure someone or leak harmful residue.
Can I put renovation waste in my normal household bin?
Only if you are certain it is safe and allowed. Hazardous or potentially hazardous materials should not be mixed with ordinary rubbish. If in doubt, keep them separate and check the right disposal route.
Do I need a specialist service for small amounts of hazardous waste?
Not always. A very small amount may be manageable if it is securely stored and clearly identified. But if there are mixed materials, leaking containers, or sharp debris, a professional clearance route is often the safer choice.
How should I store hazardous renovation waste before collection?
Keep it sealed, stable, and away from heat, children, and pets. Use sturdy containers, label unknown items, and avoid stacking anything that could tip, split, or leak.
What if I find an old unlabeled tin or chemical container?
Do not open it. Keep it closed, isolate it from other waste, and handle it with extra caution. Unknown items should never be treated casually, even if they look small or old.
Is builder's waste the same as hazardous DIY waste?
No. Builders' waste often includes general rubble, timber, plaster, and packaging. Hazardous DIY waste refers to items that need extra care because of fumes, contamination, sharp edges, or chemical content.
Can hazardous waste be collected with other renovation debris?
It can often be collected as part of a mixed waste clearance, but it should be separated first. The more clearly it is sorted, the safer and easier the collection usually becomes.
What should I do with broken tiles, glass, or sharp offcuts?
Wrap or box them securely so they do not puncture bags or injure anyone. Clearly marked containers are useful here. Sharp waste is one of those things that always deserves more respect than it gets.
How do I know if a waste pile needs professional help?
If the pile contains chemicals, strong odours, leaks, sharp fragments, or a lot of mixed debris, professional help is usually sensible. If you are unsure what something is, that is another good sign to stop and assess it.
Can renovation waste be recycled?
Some of it can, depending on the material and condition. Clean, separated waste is much more likely to be recyclable than mixed or contaminated waste, which is why sorting matters so much.
What is the safest first step after finishing a renovation?
Do a careful walk-through and separate hazardous items from general waste before anything gets bagged together. That one step prevents a lot of problems later.
How quickly should hazardous DIY waste be removed?
As soon as practical. Leaving it in living areas, hallways, or gardens increases the chance of leaks, cuts, smells, and accidental contact. The sooner it is cleared, the better the space will feel.